Are you a lebara user and looking for internet Settings of Lebara than we have share manual Lebara APN Settings that will help you to connact internet in your mobile phone so that you can browse the web, use e-mail, and able to send MMS messages.
APN Settings Of Lebara:
- Android APN settings for Lebara
- iPhone APN settings for Lebara
- BlackBerry APN settings for Lebara
- Windows Phone APN settings for Lebara
- Nokia feature phone APN settings for Lebara
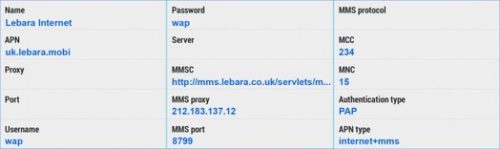
Android APN settings for Lebara

Here we explain all the steps about how to add Lebara mobile internet settings manually on an Android cell phone.
- Open Settings on the Home screen.
- Tap Wireless and networks or more (that’ll depend on your Android version).
- Tap Mobile networks > Access point names.
- Tap the Menu button (this could be the lower left the soft key, 3 dots in the top right corner, or the word ‘more’).
- Tap New APN.
- Type the following:
- Name: Lebara Internet
- APN – uk.lebara.mobi
- Username – wap
- Password – wap
- MMSC – http://mms.lebara.co.uk/servlets/mms
- MMS Proxy – 212.183.137.12
- MMS Port – 8799
- Authentication type – PAP
- APN type – Tap internet+mms or type *
- Tap Menu > Save.
- Pick the name we’ve just created.
- Next, to your signal bars, you’ll now see 4G, 3G, H, E or G. This shows you’re now connected.
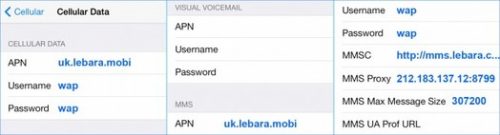
iPhone APN settings for Lebara

Here we describe the complete process for Lebara network automatic settings if your iPhone is not getting these settings automatically.
- Tap Settings > Mobile/Cellular Data.
- Tap Mobile/Cellular Data Options.
- Tap Mobile/Cellular Data Network.
- Enter the information below:
Mobile or Cellular Data settings
- APN: lebara.mobi
- Username: wap
- Password: wap
Visual Voicemail settings
MMS settings
- APN: lebara.mobi
- Username: wap
- Password: wap
- MMSC: http://mms.lebara.co.uk/servlets/mms
- MMS Proxy: 183.137.12:8799
- MMS Max Message Size: 307200
- Press the left arrow at the top of the screen 3 times.
- Press the Home button.
- To make sure these settings have worked, look next to your signal bars. 4G, 3G, E or GPRS shows you’re now connected.
BlackBerry APN settings for Lebara
Explained below is a complete process to connect your BlackBerry 10 mobile phone for cellular data.
Internet APN
- Swipe downwards from the top of the screen to get you to the notification panel.
- Tap Settings > Network connections > Mobile network.
- Tap APN > Mobile plan and choose Contract or Prepay.
- Enter the following:
- Access Point Name: lebara.mobi
- Username: wap
- Password: wap
- Tap Save (in the top right corner).
- You should now see 4G, 3G, H, E or G at the top of the screen. This shows you’re connected.
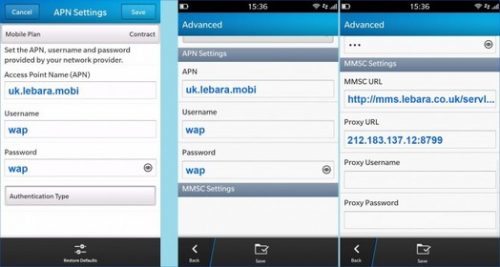
MMS APN
- From the Home screen, swipe across to the BlackBerry Hub
- Tap Menu (3 dots) > Settings.
- Tap Text messages, then tap Advanced.
- Type in these settings:
- APN: lebara.mobi
- Username: wap
- Password: wap
- MMSC URL: http://mms.lebara.co.uk/servlets/mms
- Proxy URL: 183.137.12:8799
- Tap Save at the bottom.
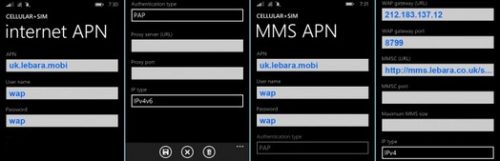
Windows Phone APN settings for Lebara
If you have some problem to connect your window phone to the network automatically, then you can follow these steps to add the network settings manually APN settings. Here we explain the complete process and these settings are different on the basis of your used windows system.
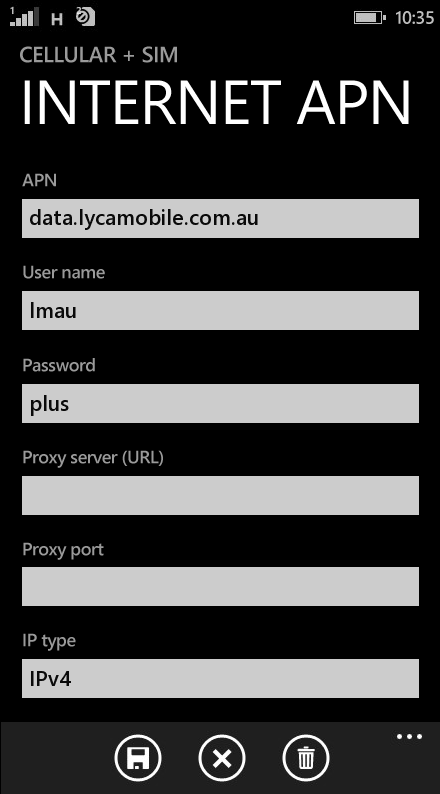
Windows 10 Mobile
- Swipe the screen from right to left. This’ll open your apps list.
- Tap settings > wireless and networks > mobile + SIM.
- Tap SIM settings > + add an internet APN.
- Type the following:
- Profile name: Lebara Internet
- APN: lebara.mobi
- Username: wap
- Password: wap
- Tick the box next to ‘Use this APN for LTE’ then tap save.
- You’ll now see 4G, 3G, H, E or G at the top of the screen. This shows that you’ve connected successfully.

- Tap + Add MMS APN.
- Type these settings:
- Profile name: Lebara MMS
- APN: lebara.mobi
- Username: wap
- Password: wap
- Proxy server: 183.137.12
- Proxy port: 8799
- MMSC (URL): http://mms.lebara.co.uk/servlets/mms
- Maximum MMS size: 307200
- Scroll to the bottom and tap Save.
Windows Phone 8.1
- Swipe the screen from right to left to open your apps list.
- Tap settings > mobile + SIM or cellular + SIM.
- Check that the data connection is on, then tap SIM settings.
- The internet APN and MMS APN settings are separate. Tap edit internet apn.
- Type this in:
- APN: lebara.mobi
- Username: wap
- Password: wap
- Tap Save. You’ll know it’s worked if you see 4G, 3G, H, E or G at the top of the screen.
- Tap edit MMS APN.
- Type these settings:
- APN: lebara.mobi
- Username: wap
- Password: wap
- WAP gateway (URL): 183.137.12
- WAP gateway port: 8799
- MMSC (URL): http://mms.lebara.co.uk/servlets/mms
- Tap Save at the bottom.
Windows Phone 8
- To open your apps list, swipe the Home screen from right to left.
- Tap settings > mobile network and turn on the data connection.
- Tapping the back button will take you back to your apps list.
- Tap settings > access point.
- If you see the name of your network provider, tap it, otherwise, Tap add.
- Enter the following information:
- Connection name: Lebara Internet
Internet APN
- Access point name: lebara.mobi
- Username: wap
- Password: wap
MMS APN
- Access point name: lebara.mobi
- Proxy address: 183.137.12
- Proxy port: 8799
- MMSC address: http://mms.lebara.co.uk/servlets/mms
- Tap the tick at the bottom to save, and you should see 3G, H, E or G at the top of the screen, which shows it’s worked.
Windows phone 7/7.5/7.8
- In order to access the apps list, you’ll need to swipe the Home screen from left to right.
- Tap settings > mobile network > add APN.
- Enter the following details:
Internet APN settings
- APN: lebara.mobi
- Username: wap
- Password: wap
MMS APN settings
- MMS Access Point Name: lebara.mobi
- Proxy address: 182.137.12
- Proxy port: 8799
- MMSC address: http://mms.lebara.co.uk/servlets/mms
- Tap the tick or disk icon to save the information.
- Confirm the APN settings.
- Check your signal bars for a connection. You will see 3G, H, E or G.
Nokia feature phone APN settings for Lebara

if you have some problem while connecting your Nokia cell phone with the network and you want to connect it with Lycamobile APN settings manually. Here we have a complete process to follow.
Internet APN
- Tap Menu > Configuration > Personal settings.
- Tap Options > Add new > Web.
- Tap Account name, type Lebara Internet, and tap OK.
- Tap Homepage, type http://m.google.com and Tap OK.
- Tap Use pref. access pt. and tap No.
- Tap Acc. point sett > Bearer settings.
- Tap Pack. data acc.pt. and type in uk.lebara.mobi, then Tap OK.
- Tap Username, type in wap then tap OK.
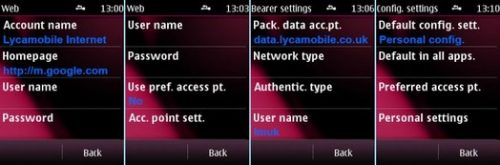
- Tap Password, type in wap then Tap OK.
- Press the back button three times.
- Press and hold the network name, Lebara Internet and choose Activate.
- Press the back button again.
- Tap Default config. sett. then Tap Personal config.
- Tap default then presses the back button twice to go back to the Home screen.
- You should see 3G, H, E or G, next to your signal bars, which means that you’re connected.
MMS APN
- Tap Menu > Configuration > Personal settings.
- Tap Options > Add new > Multimedia msg.
- Tap Account name, type Lebara MMS and tap OK.
- Tap Server address, type http://mms.lebara.co.uk/servlets/mms and tap OK.
- Tap Use pref. acc. pt. and tap No.
- Tap Acc point sett. > Proxy > Enable.
- Tap Proxy address, type 212.183.137.12 and tap OK.
- Tap Proxy port, type 8799 and tap OK.
- Tap Bearer settings.
- Tap Pack. Data acc. pt., type uk.lebara.mobi and tap OK.
- Tap Username, type wap, and tap OK.
- Tap Password, type wap, and tap OK.
- Tap back three times.
- Press and hold your finger on the Lebara MMS name and tap Activate.
- Tap Back > Def. config. Sett. > Personal config.
- Tap Default, then tap Back twice to get to the Home screen.