
Are You Looking For Manual T-Mobile EE APN Settings And MMS Setting Than You can read Full Guideline Below That help’s you to Configure Your Mobile internet settings manually and its for all devices included Samsung, iPhone, Nokia, Htc, Windows Phones and all other Models – so that you can browse the web, use your electronic mail, and send MMS messages.
T-Mobile EE APN Settings:
- Android APN settings for EE
- iPhone APN settings for EE
- BlackBerry APN settings for EE
- Windows phone APN settings for EE
- Nokia feature phone APN settings for EE
Android APN settings for EE

Here we explain how to add the EE internet settings manually on any Android phone if it is not connected automatically.
- Open the Settings and tap Wireless and networks or More (this might be different on different phones).
- Choose mobile networks > Access point names.
- Tap the Menu button (three dots).
- Choose new APN and type in:
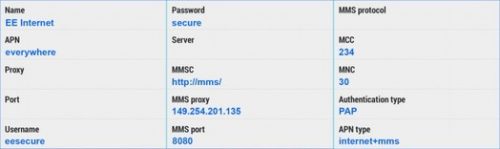
- Name: EE Internet
- APN: everywhere
- Username: eesecure
- Password: secure
- MMSC: http://mms/
- MMS Proxy: 254.201.135
- MMS Port: 8080
- Authentication Type: PAP
- APN Type – You might be given a list to choose from, or asked to type something in. If it’s a list, choose internet+MMS. If you’re asked to type something in, type a * on its own.
- Press the Menu button and tap Save.
- Make sure the new APN is picked. You might need to tap the network name to turn it on.
- When your mobile data is working, you’ll see 4G, 3G, H, E or G next to your signal bars at the top of the screen.
iPhone APN settings for EE

Here we explain the process to add APN setting manually if your iPhone hasn’t been connected to the Internet automatically.
- Open the Settings and choose mobile data or cellular data (it depends on your network).
- Tap mobile data network or cellular data network.
- Type this in:
- Mobile/Cellular Data:
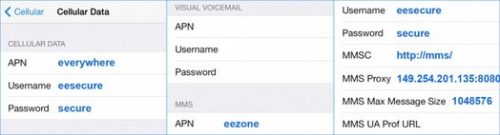
- APN: everywhere
- sername: eesecure
- Password – secure
MMS:
- APN – eezone
- Username – eesecure
- Password – secure
- MMSC – http://mms/
- MMS Proxy – 254.201.135:8080
- At the top of the screen, tap the left arrow three times.
- Press the Home button.
- When your mobile data is working, you’ll see 4G, 3G, H, E or G next to your signal bars.
BlackBerry APN settings for EE
Explained below is a complete process to connect your BlackBerry 10 mobile phone for cellular data.

Internet APN
- Open the settings and tap Network connections > Mobile network.
- Choose APN.
- Tap Mobile Plan Selector and choose contract or prepay depending what you use.
- Type this in:
- Access Point Name: everywhere
- Username: eesecure
- Password: secure
- Tap save.
- Look next to your signal bars for 4G, 3G, H, E or G. When it’s there, your mobile data is working.
MMS APN
- Swipe the Home screen from left to right and tap menu (3 dots in the top-right corner).
- Choose Settings > Text messages > Advanced.
- Scroll past the SMS settings and find the APN settings.
- Type these settings in:
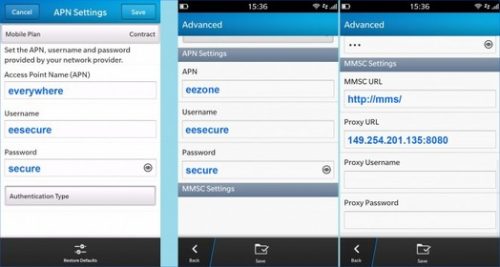
APN Settings:
- APN: eezone
- Username: eesecure
- Password: secure
MMSC Settings:
- MMSC URL: http://mms/
- Proxy URL: 253.201.135:8080
- Press save.
Windows phone APN settings for EE

Your windows smartphone ought to hook up with the net robotically, however in case you’re having issues, comply with those steps to manually upload the community APN settings. The settings are different relying on the version of home windows you’re the use of.
Windows 10 Mobile
- Swipe the Home screen from right to left and choose Settings.
- Tap network and wireless > mobile+SIM > SIM settings.
- Choose + add an internet APN.
- Fill in the form with these settings:
- Profile name: EE Internet
- APN: everywhere
- Username: eesecure
- Password: secure
- Tick the box next to ‘Use this APN for LTE’ and then tap Save.
- Choose + Add an internet APN.
- Fill in these MMS settings:
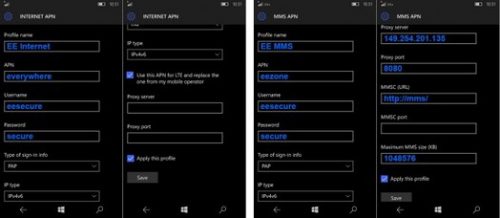
- Profile name: EE MMS
- APN: eezone
- Username: eesecure
- Password: secure
- Proxy server: 149.254.201.135
- Proxy Port: 8080
- MMSC URL: http://mms/
- Maximum MMS size: 1048576
- Tap save.
- You’ll see 4G, 3G, H, E or G when your data is working.
Windows Phone 8.1
- Open the Settings and tap mobile+SIM or cellular+SIM.
- Check that the ‘Data connection’ is turned on, then press SIM settings.
- Choose edit internet APN.
- Fill in these settings:
- APN: everywhere
- Username: eesecure
- Password: secure
- Choose save (looks like a disk).

- Choose edit MMS APN.
- Type in the following information:
- APN: eezone
- Username: eesecure
- Password: secure
- WAP gateway URL: 149.253.201.135
- WAP gateway port: 8080
- MMSC URL: http://mms/
- Choose save.
- Look for 4G, 3G, H, E or G next to your signal bars. When it’s there, your data is working.
Windows phone 8
- Open Settings and choose mobile network, making sure that ‘Data connection’ is turned on.
- Press the back button to go back to the apps list and tap Settings.
- Choose access point.
- If you can see the name of your network, tap it to use it. If you can’t, choose add.
- Fill this stuff in:

Internet APN:
- Connection name: EE Internet
- Username: eesecure
- Password: secure
- Proxy address: 149.253.201.135
- Proxy port: 8080
- MMSC address: http://mms/
- Tap the tick to save.
- When you can see 4G, 3G, H, E or G, next to your signal bars, you’re connected.
Windows phone 7/7.5/7.8
- Open Settings and choose mobile network.
- Tap APN.
- Type these settings in:
- Name: EE Internet
Internet APN:
- APN: everywhere
- Username: eesecure
- Password: secure
MMS APN:
- MMS Access Point Name: eezone
- Username: eesecure
- Password: secure
- Proxy address: 149.254.201.135
- Proxy port: 8080
- MMSC address: http://mms/
- Press the tick to save (might be a disk icon).
- Press the new APN settings to use them.
- 4G, 3G, H, E or G will show next to your signal bars when it’s working.
Nokia feature phone APN settings for EE

if you have some problem while connecting your Nokia cell phone with the network and you want to connect it with T-Mobile EE APN Settings manually. Here we have a complete process to follow.
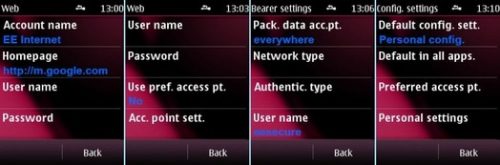
Internet APN
- Press Menu > Configuration > Personal settings.
- Tap options > add new.
- Choose web to start filling in the manual settings.
- Press account name, type in EE Internet then tap OK.
- Press homepage, type in http://m.google.com, then tap OK.
- Press use pref.acc.pt then tap no.
- Press acc point sett > bearer settings.
- Choose pack. data acc. pt then type in everywhere and tap OK.
- Press username then type in eesecure and tap OK.
- Press password then type in secure and tap OK.
- Press the back button three times to go back to the network list.
- Press and hold the name EE Internet and then press activate.
- Press the back button.
- Choose def. config. sett and press personal config > default.
- Press the back button twice more and get back to the Home screen.
- 3G, H, E or G showing next to your signal bars means you’re connected.
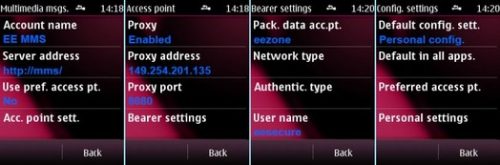
MMS APN
- Find and choose the menu option on the Home screen.
- Choose configuration.
- Choose personal settings.
- Choose options.
- Now choose add new.
- Choose multimedia msg. These settings will let you send picture messages.
- Choose account name, type in EE MMS, then choose OK.
- Choose server address, type in http://mms/ and choose OK.
- Choose use pref. acc. pt and Choose no.
- Choose acc point sett.
- Choose proxy, then Choose enable.
- Choose proxy address and type in 149.254.201.135, and choose OK.
- Choose proxy port, type in 8080 and choose OK.
- Choose bearer settings.
- Choose pack. data acc. pt, type in eezone and choose OK.
- Choose username, type in eesecure, and choose OK.
- Choose password, type in secure, and choose OK.
- Press the back button three times to return to the list of networks.
- Press and hold on the network name, EE MMS, then choose activate.
- Choose the back button.
- Choose def. config. sett. and then choose personal config.
- Choose default.
- Press the back button twice, which will take you back to the Home screen.
You May Also Check: